


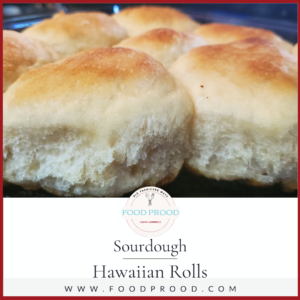
Sourdough Sweet Hawaiian Rolls

The family really enjoys these sweet Hawaiian rolls very much. Between this recipe and the Honey Butter Rolls it can be hard for me to pick which one to make. I probable make the Honey Butter Rolls more often as I may not have the Pineapple Juice on hand. I purchase the pineapple juice from Vitacost.com they have a really tasty organic one that is a good price.
Which Roll will be your Favorite? Sourdough Hawaiian Rolls OR Honey Butter Rolls?

These are a soft delicious dinner roll which also could be used for sandwiches or snack time. Plus they are Sourdough so you get that added nutritional benefit by letting the dough ferment overnight so the phytic acid is broken down so your body is able to absorb the nutrients from the ingredients. I like to grind my own wheat berries (Organic Hard White Wheat Berries from Azure Standard) and mix it with Organic Unbleached AP Flour from Coscto. The nutrient benefit from grinding your own berries is amazing but I really like using the AP flour from Costco to help them not be as dense if we used all wheat berries. If you do grind your own Wheat Berries be use to use 2 tablespoons less per cup as they tend to absorb the liquid more so you’ll end up with a denser roll. Which would be fine to, if it’s to dense always turn it into breadcrumbs! Original recipe adapted from Little Spoon Farm- thank you for your inspiration!
Glass dish is preferred for baking over the cast iron- I know, it’s crazy I say that!
Ingredients:
- 2 Tablespoons Butter (OR Lard)
- 1 Cup Pineapple Juice
- ¼ Cup Milk
- 5 Tablespoons Sugar or Brown Sugar
- 2 Teaspoons Salt
- ½ Cup Sourdough Starter (Fed or unfed)
- 3 2/3 Cups Flour

Directions:
- Melt the butter plus add in the pineapple juice, sugar and milk and let cool.
- Mix in the remaining ingredients in your mixer (Or mix by hand) and pour in the mix from above.
- Using your dough hook allow it to mix for 3-5 minutes. The dough will be sticky. Cover and allow to ferment overnight.
- The next morning turn your dough out onto a floured surface and divide into 12 equal pieces.
- Melt 3 tablespoons of butter directly in a 9×13 GLASS baking dish in your oven or melt separate and pour into the glass baking dish.
- Using the pinch and pull method shape out your rolls and place smooth side down and repeat for remaining sections.
- Rotate and coat the rolls in the melted butter and turn seam side up. Allow to rise for 3-4 hours or until puffy.
- Bake in a preheated oven at 375 Degrees F for 25 minutes. Enjoy!
Note: Please make sure it’s a glass baking dish, I’ve tried cast iron and the rolls were not as soft.
Pinch & Pull Method Video:
Recommended Items


Click on an image to get started!


